Showing posts with label Tutorial. Show all posts

Sunday, May 5, 2013

Budget Friendly Copic Storage

Spring blindsided me a bit this year. Today was my first tri of the season and lets just say I was much happier with my results last year.  There have been too many things going on at home and at work so I've been slacking on my training and slacking on my posts. If you're reading this though, chances are you're more interested in Copic storage than a race report so I'll get to the point of this post - my new budget friendly Copic storage.

A few months ago I started looking at various options to store my growing collection of Copics markers. There are some pre-made options on the market, but most that fit in with the rest of the things in my space either didn't have the right dimensions or were more than I was willing to spend. I also saw some neat tutorials for cubbies made out of foam board, but I wanted something that could handle more weight if I wanted to store things on top. I was able able to alter store bought bins and the 'semi custom' project ended up under $25 total.

copic markers modified Craftologie bin
Close up:
copic storage tutorial Craftologie

What you need:
  • Craftologie Rectangle Storage bins.I  got mine from Joann's website. They're priced $12.99, but you can get them with the coupon or on sale for under $7 each. I couldn't find the dimensions anywhere so if you're interested, the external dimensions of each bin are 5.5"W x 5.75"D x 11.125"T. The internal dimensions are about 4.75"W x 4.875"D x 10.5"T.  
  • Particle board or foam board or acrylic that you can cut into 4 3/4" strips.I used 1/4" particle board from hardware store that was leftover from another home project. I cut the pieces with a saw and then pained them to match but if you use foam board  you can cut them with a knife.
  • Thumb tacks
  • Small hammer
  • Small ruler or tape measure
  • Bolt cutters

Directions:
I apologize for the lack of pictures here. The ones I took as I was working on the project turned out blurry. If something doesn't make sense, feel free to leave a comment on the post.

1. Cut and paint the particle board if you haven't already. You will need 2 pieces for each box to make 3 cubbies, but if you want smaller compartments you can divide each bin into 4 compartments. My pieces were ~4 3/4" to fit inside but measure each box because I found that there were slight variations in size.

2. Measure off and mark where you want the front of your first shelf to be. For my cubbies, I measured off 1/3 of the height and marked it on each side inside the shelf. I then measured off 1/4 - 1/2" below the front measurement and made the marks in the back of the box. This is to tilt the shelves down a bit so the markers don't fall out when you pull one out. You can see what tilt works better for you, just use the same offset for the rest of the project.

3. Measure the length of the pin part of the thumb tack you're using. If its longer than 2/3 of the side wall of the box, you'll need to use bolt cutters to cut off part of the tip so when you insert the pin, it doesn't pierce through to the outside of the box. You'll need 4 pins for each shelf and maybe some extras in case a few break. I'm sure other things will work here too so if you find something that doesn't need alternations, let me know.

4. Push or hammer in the pin into each of the marked locations. If the pins are not going in, you can try using one uncut one to make the initial indention and then hammer the shorter one in.

5. After you put in the first 4 pins, put in one of the shelf pieces to make sure it fits and looks as expected. Then finish inserting the rest of the pins and sliding in the shelves on top.

The one thing I still need to do is add small labels to the caps of my Ciao Copics.

If you want to see more pictures of my craft room, you can find them on this post.
~Olga

Saturday, September 5, 2009

Modern Vintage - Tips For Scrabooking Old Photos

For a long time I didn't know how to approach scrapping heirloom photos because they look more natural in a vintage type layout, but I have a more contemporary, ad-hoc style pages. It wasn't until last year when I was required to create a vintage layout for a few challenges that I actually gave it a try. I was pleasantly surprised that it wasn't as difficult as I imagined. I was still using my "improv" style but with a few little shortcuts the layouts took on an old-fashioned feel.
Vintage scrapbook layout, heritage scrapbook using antique cream from Creative Imaginations, black and white page

Supplies:

  • Paper:Antique Cream collection from Creative Imaginations, basic black 
  • Ink: Basic Black 
  • Accessories: Heidi Swapp chipboard clocks, pin, pearls and brads from StampinUp pretties kit, kraft taffeta ribbon

Shortcuts to a vintage look:
1) It's all about the paper!
Really. The paper is the main element on the page, so it has the biggest impact. Neutral tones are the easiest to work with, but rich, jewled tones such as navy, burgandy and dark purple work well too. Not to say that you can't use bright colors, but because of their vibrance it's harder to pull off an aged look.

Choose vintage or aged designer paper. I've seen some great examples in the travel section, with script writing or distressed florals. Can't find vintage paper? Read shortcut #2
Finally the photo itself. Print it in sepia or black and white. You can use photo editing software to "distress" the photo ahead of time or you can do it by hand.

2) Distressing
I could do several tutorials on this topic alone, so I'm just going to cover the ideas and if you have question on the details there are a ton of resources onilne or just post a comment and I'll be happy to answer.
What can be distressed? Well, just bout anything on your layout - the photos, paper, embelishments etc. Some of the popular techniques include: roughing up the edges (with a distressing tool or a pair of scissors), sponging, bending and crinkling the paper, using sandpaper to scrape the paper or photos.

The cracked glass technique is another great look for vintage layouts. Just emboss an image with thick, clear embossing powder and when it sets, bend the image to crack it in a few places. Use as is or finish it off by adding some ink to the cracks to emphasize them. Voila - the cracked glass technique.

Did you know that heavy duty cardstock like Stampin'Up can be distressed to look like worn leather if you're going for a western theme?! Crinkle and rub the paper (creamy caramel, close to cocoa or a similar color works well). For added emphasis sponge the edges and crinkles. You can leave it as is, or stamp an image on top.


3) Complement the era
Where you would normally use ribbon - tie a piece of lace. Add a jewel or a picture of one. Maybe feathers. Use stamps to help emphesize the time period or an "aged" look. If unsure about what fits, do some research on the style of the era you're trying to portray or use generic "timeless" items such as: pins, flowers, clock (not digital), old style postage, etc.

On the layout above I let the paper do most of the work for me. It was neutral with a script pattern that resembled an old handwritten letter, so it fit well. I still scattered the photos and added journaling blocks just like i would on a modern page, however, i added a few "timeless" embelishments such as a clock chipboard piece, neutral ribbon, pearls and pin. Added some journaling and the page was done.

The same concepts can be applied to a card. I used neutral DP that looked like old letters for the background, added pewter eyelets to keep with the aged look, distressed and slightly sponged the edges of the image and added a few other embelishments in the same color scheme.


Eiffel tower card, vintage distressed technique, pewter eyelets stamping on metal
Supplies:

  • Stamps: Eiffel Tower from Stampabilities
  • Paper: Heritage Postcard by Provo Craft
  • Ink:Going grey, sahara sand, StazOn (to stamp on metal)
  • Accessories: Stampin'Up! pewter jumbo eyelets, metal tag, twine, ribbon from Hobby Lobby
  • Tools: Crop-a-dile
Other things to keep in mind when scrapbooking old photos:
  • Do NOT use the originals. Scan them and then print at home or through a photo processing service. Some places even offer photo restoration services. 
  • If you're very conscientious about your albums lasting for decades, be careful to use acid-free items on the layout (including adhesives and inks) or spray the page with a product like "Make it Acid Free" by Krylon to neutralize the acidity and make the pages archival safe. 
  • Let the photos take center stage. 
  • Ask family members to help with the details of the story. If you or someone else wasn't there when the photo was taken, write down the memories of the the people or the place in the photo.
      ~Olgy

    Saturday, January 3, 2009

    Fun Flock Tutorial and Tips

    I have a few New Year related posts I want to do, but first here's a fun flock tutorial I promised earlier.

    Fun flock, also known as flocking, is made up of loose fibers and can be used to add fuzzy appearance to craft projects. I love using it on cards with little critters and it looks great on anything from flower, clothing images, alphabet, brads and much more. Fun flock is sold in some local and online retailers. I bought mine at Archiver's.

    Working with fun-flock is somewhat similar to working with embossing powder, except it does NOT need to be heat set. I'll walk you through a few different adhesive options and do's and don't tips.

    LIQUID GLUE
    This is the method I use most often because it's flexible and requires no extra tools.
    PROS
    : good precision, quick and easy to apply
    CONS: dry time

    panda stamp, handmade, flocking, fun flock, card, tutorial1. Stamp the image and evenly apply glue to the sections you want covered. Don't let the glue dry out before you apply the flocking.
    Tip: stay inside the lines or even leave a slight gap when applying glue because when pressing in the flocking the glue may spread out. In my example I covered the white sections with glue and left a little extra space around the eyes and mouth of the panda.

    panda stamp, handmade, flocking, fun flock, card, tutorial2. Pour fun flock over the image, covering it generously. Make sure you have embossing tray or scrap paper under your image so you can easily pour the extra back in the container.
    Press the fibers into the glue firmly. Don't rub, just make sure you have plenty of access flock covering the image and press into it. This helps make the flocking feel fuller and more even in the end. If you skip this step, the end result could be a bit patchy and have “bold” spots.
    Let the image sit for 10-15min. Don't tap off the flocking yet, just set it aside until the glue dries thoroughly.

    flocking, fun flock, tutorial, handmade, card, scrapbook, Stampin'Up!, sticky letters3. Tap off the flocking onto embossing tray or scrap paper and tap the paper a few times to get access off. If some flocking is still falling you can VERY GENTLY and evenly rub the image with your thumb to help the access come off.


    panda stamp, handmade, flocking, fun flock, card, tutorial4. If flocking covers parts of the image you didn't want to use piercing tool or something else pointy to gently scrape the areas being careful to not scrape the paper. For example on my image even though I didn't apply glue to the eye area on the Panda, flocking still covered them partially so I pushed the “fur” out of the areas.

    Panda stamp, handmade, flocking, fun flock, card, tutorial5. Voila! It's ready to be used on a card or layout.


    STICKY LETTERS OR TAPE RUNNER


    This is the first time i tried using Stampin'Up! Sticky letters and was pretty happy with the results.flocking, fun flock, tutorial, handmade, card, scrapbook, Stampin'Up!, sticky letters

    PROS: no dry time, even application
    CONS: requires extra accessories such as adhesive shapes. If using tape runner then have less precision and takes longer to apply than liquid glue.
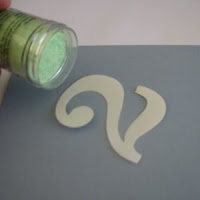


    flocking, fun flock, tutorial, handmade, card, scrapbook, Stampin'Up!, sticky letters1. Peel off the cover on your image to reveal sticky side. I peeled off one side and peeled off the back after I was done, but you may find it easier to adhere to image to the project first.


    flocking, fun flock, tutorial, handmade, card, scrapbook, Stampin'Up!, sticky letters2. Follow steps 2 and 5 from the Liquid glue portion of the tutorial. The upside here is that there's no drying time so you can tell right away if the coating is even and thick. I found that after the pressing in the powder if the coating isn't thick enough, you may need to picked up the image and add pinches of flocking with your hands to individual areas, then press and gently rub while holding it between your thumb and index finger. It's a bit messy, but the results are more consistent. Be careful to not rub too hard as the adhesive may roll up and come off.

    flocking, fun flock, tutorial, handmade, card, scrapbook, Stampin'Up!, sticky letters3. If you don't have a self adhesive image, you can also try to create one yourself by applying tape adhesive to paper or chipboard. I had to to that for one of the numbers for a layout in my title because I needed two 0s but the set only had one. I traced the image, cut it out and covered it with tape adhesive. Be careful to cover the entire area without gaps and try to keep the layers fairly even. Finish by following steps 2.

    Note: this works ok on larger alphabets but would be difficult on more intricate designs. You also need to be very careful about peeling or rubbing off the adhesive from your paper or chipboard while applying the flocking.

    flocking, fun flock, tutorial, handmade, card, scrapbook, Stampin'Up!, sticky letters4. Finished letter.


    HEAT & STICK POWDER

    I actually had the least success with this method and it took me a few tries to get decent results. For larger or more detailed areas this technique may be the better option.

    PROS
    : allows to stamp the image, no need to trace with glue
    CONS: requires extra tools such as heat and stick powder and heat tool, the timing has to be very quick.

    flocking, fun flock, tutorial, handmade, card, heat and stick powder, Versamark, Stampin'Up!, heart1. Stamp the image with Versamark


    flocking, fun flock, tutorial, handmade, card, heat and stick powder, Versamark, Stampin'Up!, heart2. Apply heat and stick powder as you would embossing powder.


    flocking, fun flock, tutorial, handmade, card, heat and stick powder, Versamark, Stampin'Up!, heart 3. Heat it and really quickly before it's dry add flocking on top. Don't heat the flocking. You can also try layout the flocking out on a tray ahead of time and then pressing the image into it.


    flocking, fun flock, tutorial, handmade, card, heat and stick powder, Versamark, Stampin'Up!, heart4. Tap off and finalize image as outlined in steps 5-7 of the liquid glue technique.


    flocking, fun flock, tutorial, handmade, card, heat and stick powder, Versamark, Stampin'Up!, heart5. As you can see from my example on the left, I didn't add the flocking fast enough the first time I tried this, so most of it didn't adhere properly. The image on the right shows a the better result.


    GENERAL TIPS FOR WORKING WITH FLOCKING

    • When choosing a stamp or image to use with this product, keep in mind that it's opaque so the best images are those with empty space in the middle or something that's easy to trace. Images with a lot of detail will not show up very well since the detail will be covered.
    • When using colored flocking, stamp or color the area with the same color ink prior to adding adhesive and flocking. This helps hide minor "bold" spots.

    I'll be posting projects with flocking shortly and look forward to your questions or comments.

    ~Olgy