Saturday, January 31, 2009

Engagement Card

It's VSBN (Virtual Scrapbooking Night) weekend which I usually plan out weeks in advance, but this time I'll be lucky if I get a few hours tonight to catch up on a few challenges. If you like scrapbooking I encourage you to check it out - it's a lot of fun! Challenges will be posted through Sunday night and you have a few more days to get all the pages in. I'll join in just after I finish up a few cards.

So many of my friends are either getting married or having kids this year. I can hardly keep up with the number of baby, shower and wedding cards so I'm resolving to reusing some of the designs. This is a CASE of my own card from last year.

Dainty Bella, StampingBella, card, handmade, engagement, bridal shower, stamped, blue, Primas, Stickels, evelope, dry embossing, Stampin'Up!I love this Dainty Bella stamp and blue color scheme. The envolope is also hand-made. I collected a few different sqare envelopes over time, traced them onto a piece of cardboard to make the template more durable and then wheneven I want a custom colored envelope I use the templates. Vellum works especially well for adding dry embossing details.


~Olgy


Supplies
(All supplies are Stampin'Up! unless otherwise noted) :

  • Stamps: Dainty Bella by Stamping Bella, Best Yet

  • Paper: Bashful blue, Retro Prints by Die Cut with a View, blue vellum for the envelope

  • Ink: Basic Black, bashful blue, chocolate chip

  • Accessories: Prima flowers, rhinestones, silver Stickles

  • Tools: Nestabilities, 1/16" circle punch, Priceless brass template for the envelope.

Monday, January 26, 2009

I'm Still Here

I don't know how I let the time get away from me. I was putting off posting until I got some new projects to share, but I had no time for stamping. Things haven't been going well at work - everybody's pay was cut by 10% so now I'm not sure whether we can proceed with buying our house. I spent a lot of time worrying, recalculating, renegotiating but now I just have to wait and see. In all honestly I don't even know if I still want to move given that all the improvements we were planning on would now have to be put on hold. At this point I just want to know one way or another.

On the bright side, after a few years or contemplation I finally bought a sewing machine. Last time I used one of these to do something other than a basic trim was when I was 9, so you can say I'm a bit rusty. I justified the purchase as an investment for making window treatments in the new house, but I'm also really excited about finally having a sewing machine handy for cards and scrapbooking. I plan on giving it a spin this weekend and posting something next time. Speaking of sewing, anyone have suggestions for good sewing websites and references?

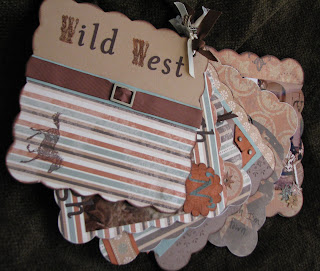
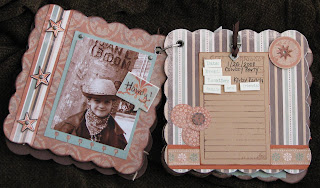
In the mean time, here's a project I made a year ago but that I had a lot of fun doing - a chipbord album for my newphew's Cowboy themed birthday party for his 5th birthday. He just turned 6 this Saturday, so it feels appropriate.
The album is by Basic Grey that I got from my sweet DSS sis last year and the papers are from the Stampin'Up Outlaw collection.

cowboy, album, scrapbook, outlaw, wanted, wild west, chipboard, cover, horse
cowboy, album, scrapbook, outlaw, wanted, wild west, chipboard, cover, handmade
cowboy, album, scrapbook, outlaw, wanted, wild west, chipboard, tough, handmade, lasso, twine
cowboy, album, scrapbook, outlaw, wanted, wild west, chipboard

~Olgy


Supplies
(All supplies are Stampin'Up! unless otherwise noted) :
  • Stamps: Wanted
  • Paper: Outlaw, creamy caramel, really rust, chocolate chip, sage shadow, close to cocoa
  • Ink: really rust, basic black, sage shadow, chocolate chip
  • Accessories: brads, Hodgepodge hardware, twine, alphabet stickers by Basic Grey, jumbo eyelets, chipboard album by Basic Grey, ribbon
  • Tools: punches, craft knife

Tuesday, January 6, 2009

Bigz Notes Frame Card

I had a chance to catch up on some scrapping this weekend before it was time to go back to work. I loved this week's featured stamper for SCS FS100. It took me a while to decide which card to use for inspiration because I loved them all. Julie's adorable Thanks a Bunch card and my take on it:
card, handmade, flower, best yet, vellum, punch, rhinestones, SCSI usually use a die cut and toss the outer paper, but this outline of the Bigz Notes die looked just like a frame so I saved it and like the the little extra color it added to this card. I stamped the stems for the flowers, adhered the flowers with a dot of glue, covered it with rhinestones and to add some ribbon. Pretty simple! I'll have to make a few more variations.

Don't forget that my card giveaway ends January 10th and I also added a section for other awesome blogger's blog candy links on the left - check them out!

~Olgy


Supplies
(All supplies are Stampin'Up! unless otherwise noted) :
  • Stamps: Oh So Lovely (stems only), Best Yet
  • Paper: whisper white, kraft, pink vellum
  • Ink: pretty in pink
  • Accessories: taffeta ribbon, rhinestones
  • Tools: Bigz top notes die, punch

Monday, January 5, 2009

2008: A Year In Review

First of all, let me apologize about the format of the Flocking tutorial in my last post. I've made a few attempts to repost it, but every time the spacing either in FireFox or IE is skewed and the pictures are misaligned. I'm sorry about that. If you're having problems viewing it try using FireFox or if you'd like a pdf of this instead, just email me and I'll send one to you.

Now, for some belated 2008 wrap-ups. I thought this was one of my least eventful years - no vacations, mostly work. Then I started listing the things I've done and to my surprise it was a lot more than I thought. A lot of firsts. A first trip to Singapore, actually Asia in general; a first tri; a first craft room (well, loft); started building a house; started this blog, etc. I actually ran out of space on my layout and had to stop at 10.

scrapbook, layout, Stampin'Up, sticky letters, resolutions, fun flock, flocking, triathlon
scrapbook, layout, Stampin'Up,fun flock, flocking, sticky letters

See Flocking Tutorial if you want to know how to make your own "fuzzy" letters.


Now thinking about 2009, I'm not big on for making New Year's resolutions. Don't get me wrong, I'm all for self improvement, I just don't tend to associate it with the first of the year. Maybe knowing that I have a year to realize something makes it feel like it has to be something BIG. Or maybe I just feel like I wouldn't get as much done right away if I had a full year in front of me (admit it, we all procrastinate). Instead I'll just try to do more "firsts." With the move I doubt I'll be traveling much, but I'd like visit some new place outside of Austin. I need to start training again... maybe even train for an Olympic distance instead of a sprint if I can find the time. I don't want to set a goal who's outcome is out of my hands, so instead of making a goal of getting published or getting on a design team I'll make a goal to submit. I often say I will and then forget or change my mind, so this year by March I want to submit at least ten of my pieces. Ok, that's more than I keep track of as is. Happy New Year!

~Olgy

Supplies
(All supplies are Stampin'Up! unless otherwise noted) :
  • Stamps: none
  • Paper: kraft, SEI Dill Blossom, whisper white
  • Ink: basic black
  • Accessories: Stampin'Up! Sticky Cut Letters, Fun Flock, Basic Grey Obscure rub-ons
  • Tools: Wishblade

Saturday, January 3, 2009

Fun Flock Tutorial and Tips

I have a few New Year related posts I want to do, but first here's a fun flock tutorial I promised earlier.

Fun flock, also known as flocking, is made up of loose fibers and can be used to add fuzzy appearance to craft projects. I love using it on cards with little critters and it looks great on anything from flower, clothing images, alphabet, brads and much more. Fun flock is sold in some local and online retailers. I bought mine at Archiver's.

Working with fun-flock is somewhat similar to working with embossing powder, except it does NOT need to be heat set. I'll walk you through a few different adhesive options and do's and don't tips.

LIQUID GLUE
This is the method I use most often because it's flexible and requires no extra tools.
PROS
: good precision, quick and easy to apply
CONS: dry time

panda stamp, handmade, flocking, fun flock, card, tutorial1. Stamp the image and evenly apply glue to the sections you want covered. Don't let the glue dry out before you apply the flocking.
Tip: stay inside the lines or even leave a slight gap when applying glue because when pressing in the flocking the glue may spread out. In my example I covered the white sections with glue and left a little extra space around the eyes and mouth of the panda.

panda stamp, handmade, flocking, fun flock, card, tutorial2. Pour fun flock over the image, covering it generously. Make sure you have embossing tray or scrap paper under your image so you can easily pour the extra back in the container.
Press the fibers into the glue firmly. Don't rub, just make sure you have plenty of access flock covering the image and press into it. This helps make the flocking feel fuller and more even in the end. If you skip this step, the end result could be a bit patchy and have “bold” spots.
Let the image sit for 10-15min. Don't tap off the flocking yet, just set it aside until the glue dries thoroughly.

flocking, fun flock, tutorial, handmade, card, scrapbook, Stampin'Up!, sticky letters3. Tap off the flocking onto embossing tray or scrap paper and tap the paper a few times to get access off. If some flocking is still falling you can VERY GENTLY and evenly rub the image with your thumb to help the access come off.


panda stamp, handmade, flocking, fun flock, card, tutorial4. If flocking covers parts of the image you didn't want to use piercing tool or something else pointy to gently scrape the areas being careful to not scrape the paper. For example on my image even though I didn't apply glue to the eye area on the Panda, flocking still covered them partially so I pushed the “fur” out of the areas.

Panda stamp, handmade, flocking, fun flock, card, tutorial5. Voila! It's ready to be used on a card or layout.


STICKY LETTERS OR TAPE RUNNER


This is the first time i tried using Stampin'Up! Sticky letters and was pretty happy with the results.flocking, fun flock, tutorial, handmade, card, scrapbook, Stampin'Up!, sticky letters

PROS: no dry time, even application
CONS: requires extra accessories such as adhesive shapes. If using tape runner then have less precision and takes longer to apply than liquid glue.
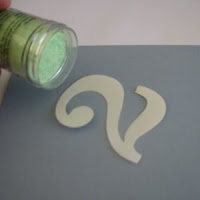


flocking, fun flock, tutorial, handmade, card, scrapbook, Stampin'Up!, sticky letters1. Peel off the cover on your image to reveal sticky side. I peeled off one side and peeled off the back after I was done, but you may find it easier to adhere to image to the project first.


flocking, fun flock, tutorial, handmade, card, scrapbook, Stampin'Up!, sticky letters2. Follow steps 2 and 5 from the Liquid glue portion of the tutorial. The upside here is that there's no drying time so you can tell right away if the coating is even and thick. I found that after the pressing in the powder if the coating isn't thick enough, you may need to picked up the image and add pinches of flocking with your hands to individual areas, then press and gently rub while holding it between your thumb and index finger. It's a bit messy, but the results are more consistent. Be careful to not rub too hard as the adhesive may roll up and come off.

flocking, fun flock, tutorial, handmade, card, scrapbook, Stampin'Up!, sticky letters3. If you don't have a self adhesive image, you can also try to create one yourself by applying tape adhesive to paper or chipboard. I had to to that for one of the numbers for a layout in my title because I needed two 0s but the set only had one. I traced the image, cut it out and covered it with tape adhesive. Be careful to cover the entire area without gaps and try to keep the layers fairly even. Finish by following steps 2.

Note: this works ok on larger alphabets but would be difficult on more intricate designs. You also need to be very careful about peeling or rubbing off the adhesive from your paper or chipboard while applying the flocking.

flocking, fun flock, tutorial, handmade, card, scrapbook, Stampin'Up!, sticky letters4. Finished letter.


HEAT & STICK POWDER

I actually had the least success with this method and it took me a few tries to get decent results. For larger or more detailed areas this technique may be the better option.

PROS
: allows to stamp the image, no need to trace with glue
CONS: requires extra tools such as heat and stick powder and heat tool, the timing has to be very quick.

flocking, fun flock, tutorial, handmade, card, heat and stick powder, Versamark, Stampin'Up!, heart1. Stamp the image with Versamark


flocking, fun flock, tutorial, handmade, card, heat and stick powder, Versamark, Stampin'Up!, heart2. Apply heat and stick powder as you would embossing powder.


flocking, fun flock, tutorial, handmade, card, heat and stick powder, Versamark, Stampin'Up!, heart 3. Heat it and really quickly before it's dry add flocking on top. Don't heat the flocking. You can also try layout the flocking out on a tray ahead of time and then pressing the image into it.


flocking, fun flock, tutorial, handmade, card, heat and stick powder, Versamark, Stampin'Up!, heart4. Tap off and finalize image as outlined in steps 5-7 of the liquid glue technique.


flocking, fun flock, tutorial, handmade, card, heat and stick powder, Versamark, Stampin'Up!, heart5. As you can see from my example on the left, I didn't add the flocking fast enough the first time I tried this, so most of it didn't adhere properly. The image on the right shows a the better result.


GENERAL TIPS FOR WORKING WITH FLOCKING

  • When choosing a stamp or image to use with this product, keep in mind that it's opaque so the best images are those with empty space in the middle or something that's easy to trace. Images with a lot of detail will not show up very well since the detail will be covered.
  • When using colored flocking, stamp or color the area with the same color ink prior to adding adhesive and flocking. This helps hide minor "bold" spots.

I'll be posting projects with flocking shortly and look forward to your questions or comments.

~Olgy